CLICK HERE FOR FREE BLOGGER TEMPLATES, LINK BUTTONS AND MORE! »

About Me

My photo
Poole, Dorset, United Kingdom
Hi, my name is Donna. I'm married and I have two lovely daughters. I have been a papercraft addict for over 15 years and love trying new things!! and sharing them with others!! If you have any questions, ideas or suggestions for this blog then please feel free to email me at the address below - Thanks for visiting, Crafty hugs Donna xx

Contact Me

Please feel free to email me at - theartofpapercrafts@gmail.com

My Youtube channel is - TheArtofPapercrafts
Showing posts with label chipboard. Show all posts

Thursday, 30 September 2010

Book for Robyn

Hi Everyone

I’m so sorry that I’ve not posted anything since the mini series but my youngest daughter has been sick and as a mum I have to put her first even if that means neglecting my blog.

Thanks for all the lovely comments about the mini, I was overwhelmed by them!!

Today I wanted to share with you a book that I decorated for my sweet friend Robyn, she is amazingly talented in her own right so please check out her blog HERE Robyn had left me a lovely comment on the idea’s book I made for myself so I knew I had to do one for her too. There is also a video of the finished book on my YouTube channel which can be found HERE

So here is the book I made for her

039 To cover the book I used some papers from Hot off the Press that I glued down with pva, once that had dried I sanded all the edges and inked them with Rusty Hinge Distress Ink and sealed the outer covers with Sparkle Mod Podge and the inner covers with Acrylic Decorators Varnish so that the papers were protected. I then coloured some pearl beading with Lettuce Alcohol ink and glued them to the crochet trims and then glued them all to the book. I took some chipboard letters and glittered them, once dry I sealed the glitter with Anita’s 3D Glaze. For the top part of the book I took a Magnolia image and coloured it with my copics, I chose this image because Robyn has been growing sunflowers in her garden this summer. To finish the book I added some silk and paper flowers and as I don’t have any prima bling flourishes I glued on individual bling stones to make my own.

042

To colour the Magnolia image I used the following copic markers

Hair – E33, YR23, YR20

Skin – E50, E00, E21, R20

Clothes – YR04, Y38, Y17, YG00. YG03, YG06, C1, C3, E49, E47, E43

Flower – YR04, Y38, Y17, E37, E35, E33, YG67, YG63

Shadows – W5, W3, W1, BV31

The paper I used was Cryogen White Hi Pearl from Craft Creations in the UK or Paper Temptress in the US

I would love to know what you think of the book!!

I hope to be back tomorrow with something made using the stamps that I just received!! My first The Greeting Farm ones!!! If you are after this range of stamps in the UK the the best prices I’ve found are from Dies to Die for and Quixotic Paperie but not only are their prices fab so is the P&P and the delivery was next day!! So please check them out!!

Thanks again for stopping by!!

Crafty hugs Donna xxx

Friday, 17 September 2010

K & Company Mini Album for a Special Friend Part Three

Hi Everyone

Thanks for the comments I personally received about this mini, they mean a lot to me and once my friend receives the mini I’ll try to let you all know what she thinks of it.

As previously mentioned in the first parts there are video’s of this mini that can be found on my YouTube channel, my channel can be found HERE

So here are the next pages from this mini

019 For this page I covered the lunchbag with another of the designs from the collection and then sprayed it with Antique Brass glimmer mist. I then made a two card slider envelope and covered it with further papers from the collection, finally I added some prima flower, some with bling in the centre and the larger ones with brads so that I could add some cording for the closure. (If you would like to know how to make the slider envelope then please either leave me a comment on here or email me and I’ll try to get it done for you) You can see the slider in action on the YouTube video.
021

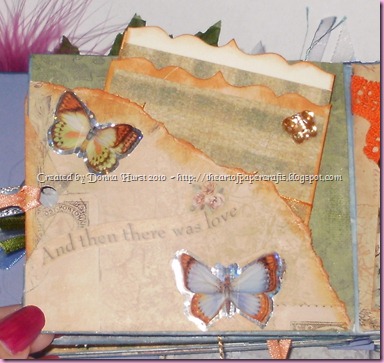
As with all the previous pages I covered the bag with paper and then sprayed it with Old Lace glimmer mist, I then took a coordinating paper and torn the corner to make a pocket for the page and inked the torn edge with Rusty Hinge distress ink, to decorate the pocket I added some 3D butterfly stickers and a text sticker from the K & Company collection. For a place for photo’s I took a mini envelope and sealed it shut then I used the Tim Holtz Alterations Brackets On The Edge Die to cut the top off, covered it with paper and inked with Rusty Hinge distress ink then tied some organza ribbon around it. I then took two pieces of card and cut to fit the envelope and cut the same edge on the top, I added a strip of paper and inked the edges and stamped the journaling spot with Rusty Hinge distress ink. Finally I added a bling butterfly to the envelope for added decoration.

022

Here is the mini envelope out of the pocket.

023

For the bag base I covered it with paper and sprayed it with Old Lace glimmer mist, I then tied some trim around it and added a Tim Holtz Trinket pin and a charm. For the photo’s I took a tag sticker and adhered it to a piece of folded card and added crystal lacquer to the butterfly and stamped a journaling spot on the back with pumpkin spice versamagic.

024

Here is a closer look at the tag out from behind the trim

025

As with the previous set of bag bases I adhered them so that they made a pocket and then made some tags for it. I covered them with papers and inked the edges with Rusty Hinge distress ink and stamped the journaling spot with Hint of Pesto Versamagic.

027

For this side of the flap I did the same as the other side but used a different sticker for the card.
028

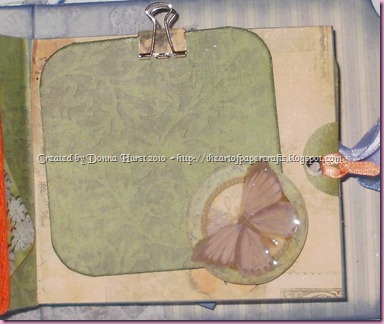
For this page I covered it with paper and sprayed it with Old Lace glimmer mist. I then made a four fold card and added papers and stamped some journaling spots with Hint of Pesto versamagic. I also inked all the edges with Forest Moss distress ink, finally I took a sticker from the same K & Company collection and stuck it to some paper, cut it out and added crystal lacquer to the butterfly, then once dry I added it to the folded card. To add the card to the page I used a spring clip that I also added paper to.

029

Here is the card detached from the page

030

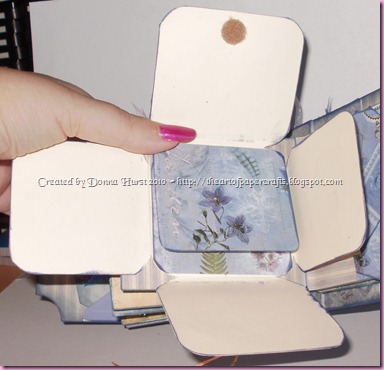
Again to start the page I covered it with paper and sprayed it with creme de cocoa glimmer mist. I then made a eight flap photo and journaling card and covered some of the flaps with papers. I didn’t add any journaling spots so that my friend can decide where she would like them. Finally I inked the edges with Night Sky versamagic ink and added a butterfly sticker to the front.
031

Here is the card with four of the flaps opened.

032

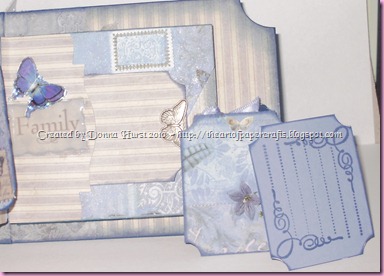
As with all the pages I covered the bag with paper and sprayed the page with Creme de cocoa glimmer mist. I then took some coordinating paper and cut a decorative edge with the Tim Holtz Alterations Ornate on the edge die and added an epoxy sticker from the K & Company collection and a 3D butterfly sticker. To add to the pocket I made three ticket tags, I inked the edges and stamped the journaling spot with Night Sky versamagic ink, for two of the tags I added a butterfly sticker from the collection and for the final tag I added a Hot off the Press butterfly brad.
033

Here is a closer look at the tags.

034

After I covered the page with paper and sprayed it with Pearl glimer mist I cut a photo mat with a Nellie Snellen multi die then inked it with versamark and embossed it a couple of times with glitter ultra thick embossing enamel. I then added it to the page but made sure the I only stuck it in the corners so that I could add some little handmade tags behind as a place for journaling. Finally I added some Prima flowers with bling in the centre and sprayed a Tom Holtz adage ticket with Meadow Lush cosmic shimmer mist and attached it with a spiral paperclip.

035

Here you can see one of the two tags a little better.

036

For the final small flap I did the same as the inside of the first flap, covered it with paper and sprayed it with pearl glimmer mist, then made a library pocket and a folded photo & journaling card that I covered with paper and ink and stamped with Stormy Sky distress ink. To finish the pocket I added a 3D sticker from the K & Company collection. I then adhered the finished pages to the book cover.

037

Here is the little photo card out of it’s pocket.

038

So here is one final look at the finished mini from the side so that you can see the fibres and charms.

I would love to know what you think of this mini, I am usually not 100% happy with anything I make but this is one of the first ever projects that I’ve done that I’m really happy with!! The only thing is the I’m really nervous about what my friend will think of it as she is one amazingly talented crafter!!!!!!!!!

Thanks as always for stopping by! I truly do appreciate the fact that you choose to come and stop by my little blog. Speak to you again soon

Crafty hugs Donna xxx

Wednesday, 15 September 2010

K & Company Mini Album for a Special Friend Part Two

Hi Everyone

I’m really sorry that I’m a couple of days late getting this next part of the mini album posted but I came down with one of the worse migraines I’ve ever had Sunday afternoon and whilst it’s now starting to clear I’ve been unable to look at a computer monitor for the past two days. In all honesty I should have done all the posts at the same time and scheduled them but it didn’t occur to me at the time.

So now I’d like to get on with sharing the mini I’ve just completed for my friend, again I’m sorry that it’s in so many parts but I wanted her to have as much room for photo’s as possible even if it is a mini album. If you would like to see the YouTube video’s of this mini then you can find part one HERE and part two HERE

So here are the next set of pages

010 I covered this page with paper from the collection and then sprayed it with pearl glimmer mist. Then I took two mini envelopes to make the pockets and added some coordinating papers, then I made a folded photo mount for the larger pocket and two tags for the smaller pocket. I used small pieces of the paper that I punched with a woodware border punch on the tags and added a butterfly sticker to the top, I inked all the edges with forest moss distress ink and stamped a journaling spot on the back. Finally I added some butterfly ribbon to the small pocket for decoration.

011 Here you can see the tags out of the pocket along with the folded photo mount.

012 For the base of the mini lunch bag page I covered it with paper from the collection and then made a pocket from matching paper that I added a border to with a woodware punch, I then sprayed the page with pearl glimmer mist. I made a tag and covered it with the same paper as the page and then stamped a journaling spot on the back and inked the edges with forest moss distress ink. Finally I added an epoxy sticker from the K & Company collection to the pocket.

013 When I attached the two bag bases together I made a pocket and the made two tags to go into it. The tags are stamped with butterflies from a Royal and Langnickle set using perfect medium and then dusted with perfect peals as was the journaling spots on the backs,

014 For this page I covered it with paper from the collection and sprayed it with pearl glimmer mist, I then made a fold out photo and journaling book that I added some papers to and then inked the edges and stamped the journaling spots with distress ink in rusty hinge. I then tied it closed with ribbon and adhered it to the page.

015 Here is the mini book untied.

016 For this page I really liked the paper so I kept it really simple by just spraying it with pearl glimmer mist and then adding one of the stickers from the collection that I stuck to some paper, cut out and painted with a mixture of pearl medium and crystal lacquer.

017 This page was covered with more papers from the collection and then I added a torn paper corner pocket to the page and sprayed it with Antique Brass glimmer mist. I made a folded card for photo’s and journaling and used a corner chomper for decoration. I inked the edges and stamped the Autumn Leaves journaling spots with Stormy Sky distress ink and finally I added some rub-ons to the pocket.

018 Here is the card out of the pocket.

Well that is all the pages for today’s post. I hope to be back tomorrow with another collection. Thanks again for taking the time to stop by my blog I truly do appreciate it.

Crafty hugs Donna xxx

Sunday, 12 September 2010

K & Company Mini Album for a Special Friend Part One

Hi Everyone

I hope you are all enjoying your weekend!! It’s lovely and sunny here on the south coast of the UK today which is nice for September!!

Today I wanted to start sharing with you a mini album that I have just finished making for a very special friend. She doesn’t know about it so I can’t say who it is for but she means so much to me and I really hope that she likes her little gift. I have also filmed the mini album and you can find the first part HERE on YouTube.

As there are a large amount of photos to be able to show the mini properly I’m going to do them over the next few days, so here are the first set of pictures:

001 This is the mini album closed up using some ball chain, the papers are from a K & Company collection from about 5 years ago that were designed by Elizabeth Brownd, they are called Garden Collage and Antique Botanicals. I used two pages from a US Michaels chipboard mini for the front & back cover and added an extra piece of spare chipboard for the spine. Once the papers were attached I sanded all the edges and distressed them with Stormy Sky and Chipped sapphire distress ink and then I mod podged them with the Sparkle Mod Podge. To finish the cover I added some feathers and silk flowers and leaf.

002

I added a binding ring to the spine and tied on some fibres and some of matching ribbons to the ones used inside the mini, then added a swivel clasp and some charms to finish it off.

004

For the inside cover I used an envelope to make a pocket and inked the edges with Versamagic in Night Sky. I made some matching tags for photo mats and journaling using coordinating papers,I stamped them with some journaling stamps from an Autumn Leaves set and some butterflies from a set by Royal and Langnickle using distress ink in stormy sky and forest moss and the used the same colours to ink all the edges.

005

For the inside pages of the mini I used small paper lunch bags and I inked all of them with distress ink in stormy sky and made matching tags to put on the paper bags to add extra space for photo’s (can be seen in the video), I left the first small flap undecorated so that my friend can put on there whatever she likes.

006

For this small flap I made a library pocket and a small booklet from the papers in the collection for photos and journaling, again I used a Studio G journaling stamp and distress ink in stormy sky for the stamping and inking the edges. I also sprayed it all with Glimmer mist in Antique Lace

006

For this page I made a pocket from a torn piece of patterned paper and inked the edge with stormy sky, then I used some stickers for decoration. I made a fold out photo and journaling book from the papers and stamped with Autumn Leaves journaling stamps using rusty hinge distress ink. Page also sprayed with glimmer mist in Antique Lace

007

008

For this page I made a pocket from the paper collection and used a woodware border punch to add a design and a quickutz die to make the nameplate that I added mini eyelets to. I made some tags for the pocket and stamped them with Perfect medium and a Aututmn Leaves stamp then used perfect pearls over the top and added a journaling spot to the backs.

009

For this page I took a white felt frame and sprayed it with Lily Pad glimmer mist, then I took some white card and sprayed that with Twilight glimmer mist. I stuck the frame to the cardstock and cut it out, added some rhinestones to the frames flowers and then added some acetate to the centre and finally glued it to the page with foam tape but left one edge unsealed so that a photo can be slipped in. The page background was also sprayed with creme de cocoa glimmer mist.

So there are the first few pages of the mini and the cover, I would love to know what you think. I’ll be back tomorrow with the next set of pages, speak to you again then!!

Crafty hugs Donna xxx

Wednesday, 14 April 2010

TWS mini album swap march 2010 – mini album I made for Izzabella

Hi Everyone

Today I wanted to share with you the mini album I made for the March TWS album swap on The Scrap Beach.

My partner for March was the lovely Izzabella who is from the UK too. We decided that we would do a Spring theme album, in the hope that spring might get here soon

As is becoming usual for me now I have filmed the mini to you to see, so here is the video

I would really love to know what you think.

I would also like to apologise that I’m not blogging as much as last year but as I’m now doing more mini albums than cards they take longer to do, but I’m hoping to try and blog more from next month

Thanks for stopping by

Crafty hugs Donna xx

Sunday, 7 March 2010

My First Swap Mini for Sharon

Hi everyone

As I explained I’ve decided to get back to scrapping for a while and because of this I joined the International Mini Album swap at The (scrap) Beach for Feb.

My partner was a very lovely lady by the name of Sharon who lives in the USA. We decided to make a love mini for each other and try to make it sort of vintage. Her favourite colours are pinks, purples, light blues, reds and browns, so with that in mind here is a twp part video of the mini album I made for her.


I would really love to know what you think.

I’ll be back soon with a video of the mini I received from Sharon and pictures of the tags I received for the Feb Tag swap on Louise's blog (Zettibettie)

Crafty hugs Donna xx

Search My Blog
